aku tanya harga, tokey kedai cakap dalam RM240 untuk rim 16...peh...silap2 tak makan aku bulan ni...
so...aku cuba tampal dulu...dalam RM5...
cek kat internet, semua site cakap tukar...sebab kalau bawak kat highway, tayar panas...penampal tu boleh tercabut...arghhhhh...stress!
info pasal tayar
Found this useful bit of info on the net (courtesy Bob Jane T Mart):
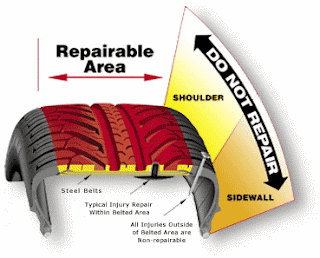
"Depending on the area of the tyre where the puncture occurs will determine if the tyre is repairable. Generally tyres with punctures in the tread area are repairable.
A flat tyre is generally caused by a puncture to a tubeless tyre's casing, allowing air to escape and causing the tyre to deflate. Punctures are usually caused by sharp objects like small nails and screws. These objects tend to cause punctures less than 5mm in diameter. If they occur within the tread area of the tyre, a repair can usually be made to the tyre.
Tyres can often be beyond repair and will need replacement if there is sizeable punctures to the tread or punctures to the tyre's shoulder or sidewall areas.
The function of a puncture repair is to seal the tyre's casing to prevent moisture or contaminants from entering the tyre casing or structure. The tyre must be removed from the rim to perform a correct puncture repair. This allows for a complete inspection of the damage and ensures the plug used to repair the puncture bonds properly with the tyre casing to make it air-tight. The repair is made from the inside out.There are several methods of repairing a puncture in a tubeless tyre. Firstly (and the least effective method) there is the tin of aerosol tyre sealant. This is simply sprayed into the tyre through the valve. As a get-you-home-slowly fix it has its place; however tyre dealers hate the stuff with a passion. When they remove a tyre which has had sealant applied, there is a messy residue all over the place.
The second method is to plug the tyre with a vulcanising compound. Available as a kit, these plugs look like bits of thick liquorice. Also included in the kit is a tube of rubber cement, a reamer, and the plug insertion tool. This was what I used when I experienced the puncture described above. Simply locate the puncture-causing-article, and remove it. Then the small reamer is used to roughen the sides of the hole. Some rubber cement is then squeezed into the hole.
The "liquorice" plug is then inserted half-way through the eye of the plug insertion tool, and then plunged into the puncture site. The idea is to insert the tool until about an inch of each end of the plug can be seen, at which point the tool is rotated 90 degrees and withdrawn quickly. Hopefully you're left with the plug in a "W" shape when seen in cross-section. The ends are then trimmed off flush with the aid of a sharp knife, and the tyre reinflated.
Remember though that whilst these plugs will be useful for the normal punctures acquired when running over a nail or screw, they can not be used for larger tears."


No comments:
Post a Comment